EVE Database Utilities
Learning Outcome
On successful completion of this lesson, students will understand how to use the EVE Database Utilities application to:
- Perform a database backup
- Restore a database
- Run scripts
- Add a new database user (not the same as a user of EVE)
Lesson
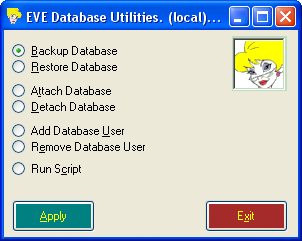
The EVE Database Utilities application is installed with the EVE Server feature (i.e. it resides on the same PC as your database). Using EVE Database Utilities you can perform database tasks such as backing up and restoring the database, running scripts, adding database users, etc.
Start the program by clicking your Start button, then All Programs then ISSYS then EVE Database Utilities. You will be presented with a Connection screen. Usually you can just click OK to Connect, but if you want to administer a database on a different server, you’ll need to change the connection settings.
The form shown above will be displayed. Choose what action you want to perform and click Apply.
Backup
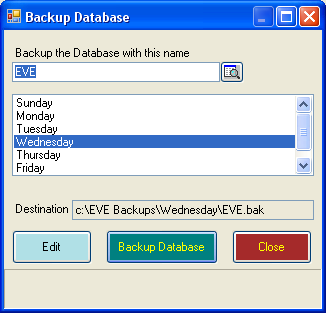
Enter the name of the database you want to backup or click the Browse button to choose the database from a list. You can choose to have backups created in different locations for different days of the week. For instance, the Monday backup could go to a removeable flash drive, the Tuesday backup could go to the C: drive, the Wednesday backup could go to a different computer on the network, etc. You can choose the locations by clicking on a day of the week in the list and then clicking Edit. A standard Folder browser dialogue box will be displayed so you can choose the new location. Please note: backups are always saved to a location relative to the computer where SQL Server is installed. So, if SQL Server is installed on PC#1 and you are running EVE Database Utilities on PC#2, and you specify c:\EVE Backups as the backup location, backups will be saved into the c:\EVE Backups folder on PC#1 NOT on PC#2.
The EVE Database Utilities program can be run from a command line with parameters to indicate what action to perform. One of the benefits of this is that you can create a Windows Scheduled Task to automatically create backups for you on a fixed schedule. In fact, by default, when you install the EVE server component, a Scheduled Task is created for you. This will create backups at 11:00 am every day and save them into the c:\EVE Backups folder on the server computer. You should ensure that this process is setup correctly by periodically examining the contents of the c:\EVE Backups folder to ensure the dates on the backup files are recent (i.e. less than a week old). FYI the command that is run by the Scheduled Task is as follows:
“C:\Program Files\Integrated Scuba Systems\EVEDB\EVEDBUtils.exe” backupdb (local)\EVE * * 1 eve
The parameters to EVEDBUtils.exe are as follows:
| Parameter | Description |
| #1: | the command to run. One of: backupdb, startsqlserver, stopsqlserver, attachdb, detachdb |
| #2: | Data Source – usually this is (local)\EVE or .\EVE to indicate that the EVE instance of SQL Server installed on the local PC should be used. |
| #3: | Username with which to connect to SQL Server. This is only applicable if you choose to connect using SQL Server Authentication. Usually you will connect using Integrated Security (see parameter #5) so this parameter is not required and you can just specify an asterix (*). |
| #4: | Password with which to connect to SQL Server. This is only applicable if you choose to connect using SQL Server Authentication. Usually you will connect using Integrated Security (see parameter #5) so this parameter is not required and you can just specify an asterix (*). |
| #5: | Use Integrated Security: use the value 1 if you want to connect using Integrated Security (i.e. using authentication based on the user that is currently logged onto Windows). Use the value 0 if you want to connect using SQL Server authentication – in this case you will need to enter a valid username and password in parameters #3 and #4. |
| #6 | The name of the database to backup. |
Restore
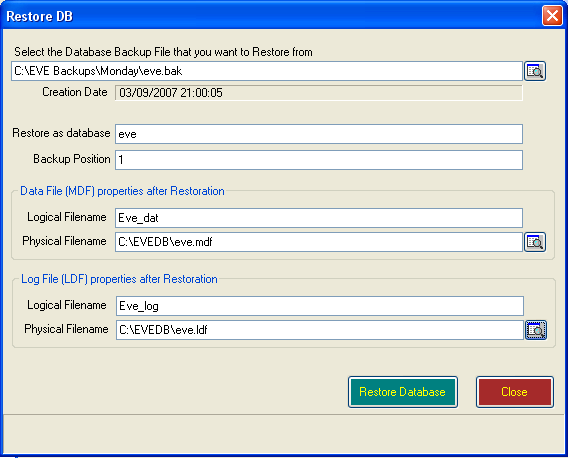
Should you ever want to Restore your database from backup, use the Restore option.
| Select the Database Backup File that you want to Restore from | In the top box, type the name of the backup file you want to restore from or click on the browse button to the right and select the file. |
| Restore as database | Enter the name that you want to call the database when it is restored. If you enter the name of an existing database, that database will be OVERWRITTEN by the backup, so choose your name carefully. |
| Backup Position | Multiple backups can be saved into one backup file. Enter the position of the backup you want to restore from. The first backup written to the file has position 1, the second has position 2, etc. Note: when backups are created by EVE or by EVE Database Utilities only one backup is saved into the backup file, so you will always use the value 1 here. However, if you are restoring from a backup saved using another program you may need to specify a value other than 1. |
| Data File Logical Filename | Enter a name that will be used internally by SQL Server to reference the database data file The default value for an eve database is EVE_dat and the default name for an eveTraining database is EVETraining_dat |
| Data File Physical Filename | SQL Server databases have 2 main files: a Data file and a Log file. For instance, the eve database has 2 files called eve.mdf and eve.ldf or eve_log.ldf. Your data is stored in the mdf file and the ldf file holds information relating to database transactions that are in the process of being saved. Both files are equally important and your database will not work unless both are present.Enter the path of the main database file (i.e. the mdf file). This file will be created by the Restore process and is the file that contains the bulk of your data so please remember the location that you specify. At time of writing, the default path specified in EVE Database Utilities is c:\Program Files\Integrated Scuba Systems\EVEDB\eve.mdf. However, you are advised to create a folder called EVEDB in the root of your C: drive (i.e. c:\EVEDB) and use that instead. I.e. set the Physical Filename to c:\EVEDB\eve.mdf |
| Log File Logical Filename | Enter a name that will be used internally by SQL Server to reference the database log file The default value for an eve database is EVE_log and the default name for an eveTraining database is EVETraining_log |
| Log File Physical Filename | Enter the path of the log file (i.e. the ldf file). This file will be created by the Restore process. At time of writing, the default path specified in EVE Database Utilities is c:\Program Files\Integrated Scuba Systems\EVEDB\eve.ldf. However, you are advised to use c:\EVEDB instead. I.e. set the Physical Filename to c:\EVEDB\eve.ldf |
When you are ready, click Restore Database. EVE will ask you to confirm by typing the word ‘yes’ since there is a danger of overwriting an existing database with the backup file.
Attach Database
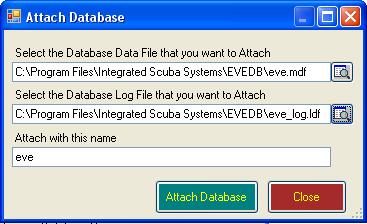
You will not usually want to use the Attach Database command. However, it is present to let you attach a database to SQL Server that was detached from this or a different instance of SQL Server. Enter the locations of the MDF and LDF files, supply a name for the database once it is attached and click Attach Database.
Detach Database
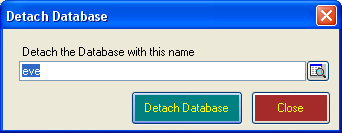
You will not usually want to use the Detach Database command. However, it is present to let you detach a database from SQL Server so you can perhaps attach it to another instance of SQL Server. Enter the name of the database you want to detach and click Detach Database.
NOTE: the database will no longer be useable until you re-attach it so use this command with caution!
Add Database User
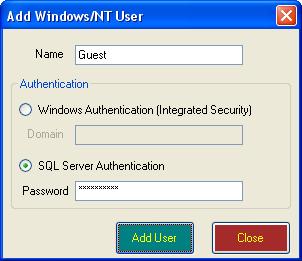
You will not usually need to use this command but it lets you create a new SQL Server user. Note: this is NOT the same as a user of EVE. You can create EVE users using the Employee form in the Data section in EVE.
Remove Database User
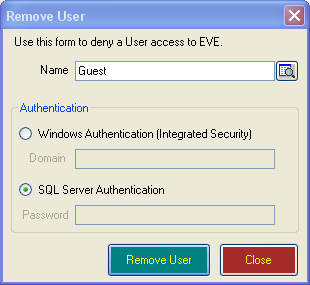
You will not usually need to use this command. It lets you remove a database user. Note: this is NOT the same as a user of EVE. You can delete EVE users using the Employee area in the Data section in EVE.
Run Script
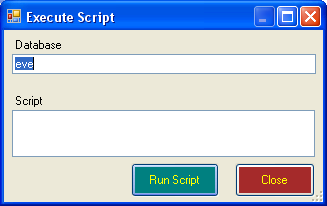
Use this command to run a database script to update data and/or the database schema. Use with extreme caution as a badly composed script could irreparably damage your database. This command is only for use by experienced SQL Server programmers.

